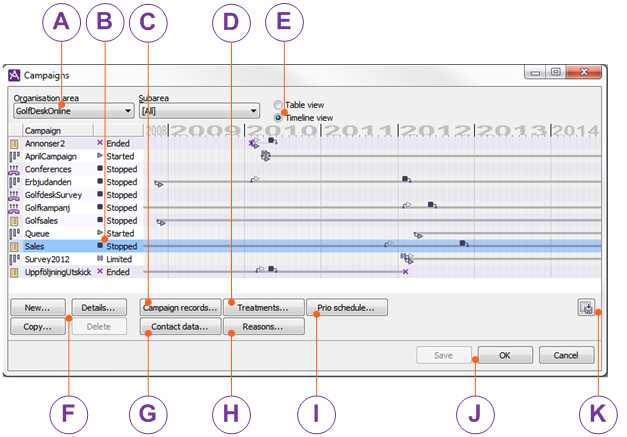
Overview of the Campaigns window

In the Campaigns window, found under the Media | Outbound telephony | Campaigns menu ,you see all your campaigns affiliated to the organisation area or subarea selected in the drop-down menus.
Double click on a campaign name to enter a new name, or on the status icon to select a new status from a drop-down menu.
Delete removes a selected campaign provided it has status
Ended. See
Basics about status of a campaignVia the
Campaign Records window you open other windows where you create, change, import, and export campaign records for selected campaign. Here is also where you administer agents’ personal records. See
Basics about Campaign call recordsOpens the Campaign details window where you:
- New...
Add a new campaign
- Copy...
Create a new campaign based on an existing campaign, i.e. some values are pre filled.
- Details...
Modify all data except short name and distribution type for an existing selected campaign.
All described in Create a new campaign
Contact data...
Create campaign unique contact data windows to be seen in ACE Agent.
Reasons...
Add reasons (feedback) to be specified after a call has been made.
Prio schedule...
Create strategies and categorize campaign records. Rule the times when each respective category shall be prioritzed for being called and change records priority up or down at different times.
Handle one or multiple campaigns in the Campaigns window and finish with one of the following buttons
- OK
Saves all changes to the database and closes the window.
- Save
Saves all changes to the database without closing the window. If saving should fail, the ACE system will note the error for that campaign, and continue with others that are to be saved. Only when the all changed campaigns have been processed, an error message is shown. Changed and not saved campaigns are seen in blue text in the table.
- Cancel
Closes the window without saving any changes.

Export information about the campaigns’ status to a file. To export campaign records first click the
Campaign Records... button. You can also use
Export in the menu opened with a right click. In the window opened, you specify the name and file format for the file to where data will be exported.

