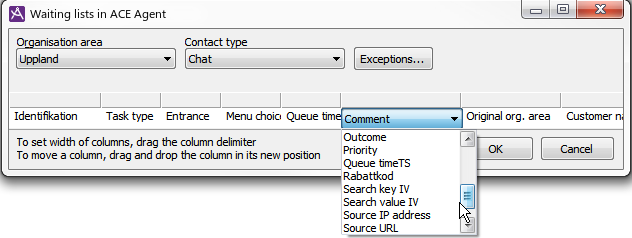
When a waiting list is opened in ACE Agent, the contacts in the waiting list are shown in a table in the support functions area. On each row a contact is shown, with contact data for the contact. Under the Agent application | Waiting lists in ACE Agent menu choice you can configure which contact data to be shown, and the width of the columns for each respective key.
The selected setting then applies to all waiting lists of a specific contact type.
By clicking in the appropriate box, a drop-down menu is opened. From the menu you select the contact data to be displayed at the given position. The last box is always empty to enable addition of a column.

In the screen-shot above you see the Waiting lists in ACE Agent window with one contact data drop-down menu open.
You remove a column by selecting a blank value for the position you want to delete. You move a column by placing the mouse pointer in the empty box directly above the title, the description of the column, and then dragging the column to its new position. To change the width of a column you drag the dividing line between the headings of the columns.
The column width set in this window will be used in ACE Agent as well.

In the picture above you see waiting lists for email configured in ACE Admin.
In the picture below you see the result in ACE Agent, a waiting list for email contacts, with the configured headings and the column widths.
The contact data key Preview of email allows the agent to see the first part of an email, before accepting the contact from the waiting list.

If you want waiting lists of the same type to be presented differently, you can specify exceptions for separate waiting lists.
Select the list you want to give a unique presentation and click on the Exceptions… button. You then make settings for exceptions in the bottom part of the window, in the same way as for default settings.

In the example picture above you see the chosen columns for a specific waiting list used for the Callback appointment schedules function.